Accounts Receivable (or A/R) refers to products or services provided by your company for which payment has not yet been received.
Transactions generated by the A/R system are recorded within the Accounts Receivable account.
You should not work directly with this account. Instead, you will work
with the four integrated GnuCash A/R application components available through the
→
sub-menu. These four components are:
Customers are people or companies to whom you sell products or services on credit.
Invoices represent the physical invoice you send to a customer to request payment. This invoice contains an itemized list of things you sold.
In addition, GnuCash also has support for Credit Notes which represent the inverse of Invoices. A credit note is usually handed to a customer to correct items that were incorrectly invoiced or returned.
Both document types will be set up using the same menu items. Credit notes were introduced starting with
GnuCashstable release 2.6.0.Jobs (optional) is where you register Customer Jobs. Jobs are a mechanism by which you can group multiple invoices to a particular customer.
Process Payments is used to register payments you received from a customer.
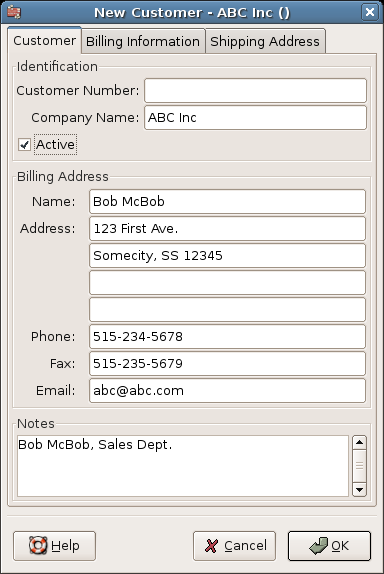
Customers are people or companies to whom you sell goods or services. They must be registered within the A/R system.
To register a new customer, enter the menu → → . Fill in customer information, such as Company Name, Address, Phone, Fax, etc.
To search for an existing customer, use the → → window. You select a customer to View/Edit from the results of the search. This window is also used to look up customers when creating invoices and processing payments.
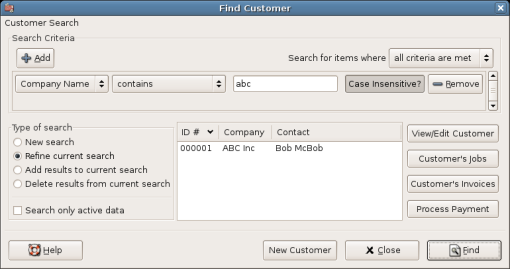
If many customers match the search criteria you provide, the search can be refined by running an
additional search within the current results. The current result set is searched when the
Refine Current Search radio button is selected. In fact, GnuCash
selects this option for you after you run the initial search.
If the customer you are searching for does not match the supplied search criteria, change the search criteria, click the New Search radio button and then the Find button. The relevant step is the New Search selection. If the customer is not in the result of the original search, and you only search within this set, the customer cannot be found, regardless of new search criteria.
 | Note |
|---|---|
To return a list of all registered active customers, set the search criterion to matches regex, and place a single dot "." in the text field area. Make sure Search only active data is checked, then click . The regular expression "." means to match anything. | |
An invoice is the paperwork you send to a customer to request payment for products or services
rendered. GnuCash can generate and track invoices.
A credit note is the paperwork you send to a customer to correct products or services rendered that
were incorrectly invoiced. GnuCash can generate and track credit notes via the same menu
entries as invoices.
| Note |
|---|---|
This section applies to both invoices and credit notes. In order to avoid repeating everything twice and to keep the text easier to read it will refer only to invoices. You can apply it equally to credit notes. Only where the behavior of credit notes differs from invoices this will be explicitly mentioned. | |
To send an invoice to a customer you must first create the new document. To create an invoice use → → . The New Invoice window must be filled in appropriately.
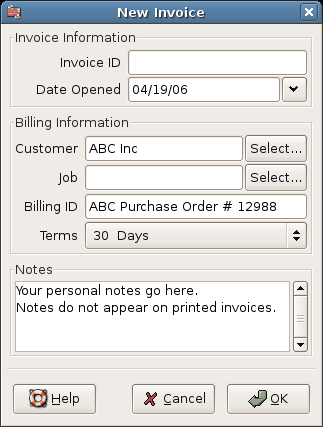
When you click the button, the Edit Invoice window opens.
From the Edit Invoice window you can enter an itemized list of goods and services you sold on this invoice in a manner similar to how the account register works. For credit notes you enter an itemized list of goods and services you refunded instead.
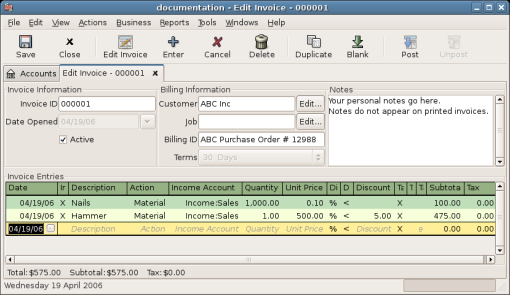
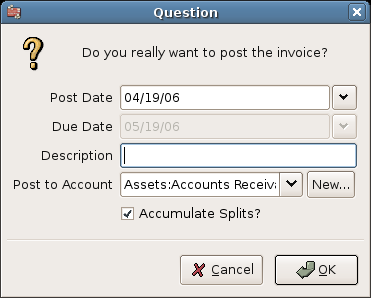
When you have finished entering all the items, you can Post and print the invoice.
When you finish editing an invoice and are ready to print, you must Post the invoice. The invoice does not have to be posted immediately. In fact, you should only post an invoice when you are ready to print it. Posting an invoice places the transactions in an accounts receivable account.
To find an existing invoice, use the → → menu item. From the results of the search, you can select an invoice to edit or view.
| Note |
|---|---|
Before you can edit a posted invoice, you will need to Unpost it. | |
One of the design goals in GnuCash’s Account Receivable system was to allow different processes
to get to the same state, so you can reach an invoice from different directions based on
the way you think about the problem:
You can search for the customer first, then list their invoices.
You can search for invoices by number or by company name.
You can list invoices associated with a customer job.
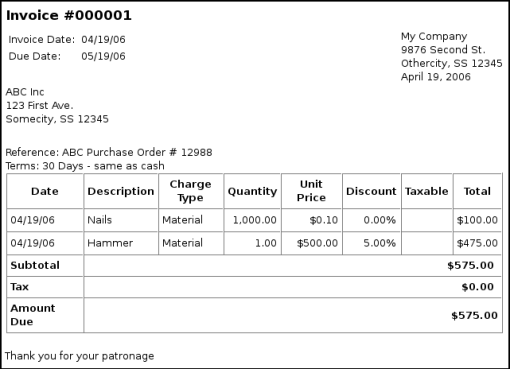
After you post an invoice, you should print it and send it to your customer. To print an invoice use → menu item.
| Note |
|---|---|
You can modify the appearance of the invoice, IE: add a company logo, etc. To do so, see the Section 13.3.6, “Changing the Invoice Appearance”. | |
Invoices can also be printed from the main window by selecting → → from the main menu. The resulting report window states that no valid invoice is selected. To select the invoice to print:
Use the Toolbar button or select → from the main menu.
Select the General tab of the report options dialog.
Click the button next to the Invoice Number field.
Search for the invoice as usual.
You can also print invoices from within the Process Payment dialog. See the Section 13.3.5, “Process Payment” for instructions on how to do so.
By default, GnuCash starts with invoice number 1 and increments from there. You can manually type an
invoice number into the text box each time you create an invoice, but this gets tiring and
sooner or later leads to duplicate numbers.
You can change the starting invoice number if it is important you. Use → , access the Counters tab, change the Invoice number value to be one less than your desired starting invoice number and click the button or the button.
Customer Jobs are used to group multiple invoices and credit notes to the same customer. Use of the Customer Jobs feature is optional. The feature is useful when you have multiple jobs for the same customer, and would like to view all the invoices and credit notes related to a single job.
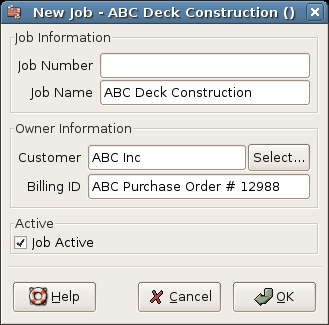
To use customer jobs, you must create them using the → → menu item. You will see the New Job window.
To edit an existing customer job, use the → → menu item. Select the desired job in the search results, and click the View/Edit Job button.
To select from the invoices and credit notes associated with a given job, use → → menu item. Select the desired job in the search results and click the View Invoices button. A window listing invoices and credit notes associated with this job appears. Select an invoice or credit note and click the View Invoice button to open an invoice editor in the main application window.
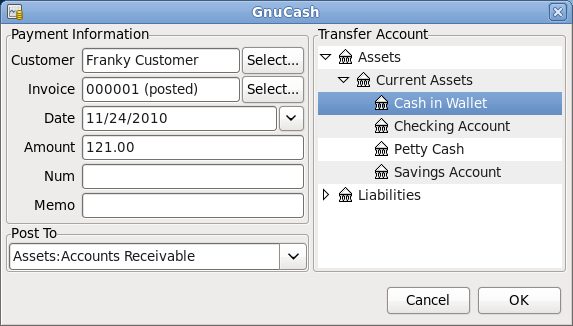
Eventually, you will receive payment from your customers for outstanding invoices. To register these payments, use the Process Payment application found in → → .
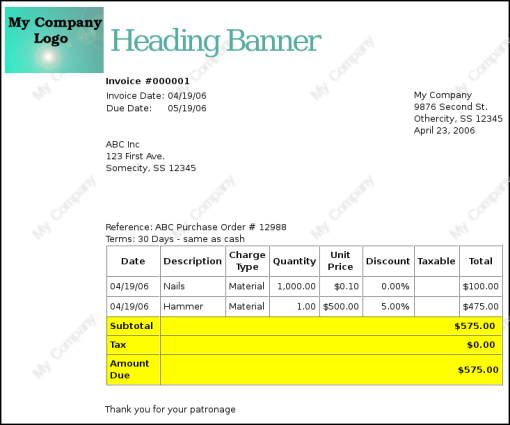
The default Invoice style, as shown in Section 13.3.3.5, “Print”, is fairly barren. The default invoice style leaves the top part of the form blank, so you can print on company letterhead paper. There are some things you can do to change invoice appearance.
Use → to enter your Company information in the Business tab of the Book Options window. Some of the entered information is printed on the right side of invoices.
To add a customized background, heading banner or logo to invoices, modify the invoice style sheets. To do this, go to → and select the button in the Select HTML Style Sheet window that will appear. You will then see a window like this:
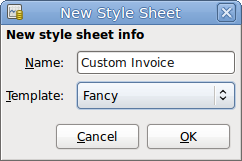
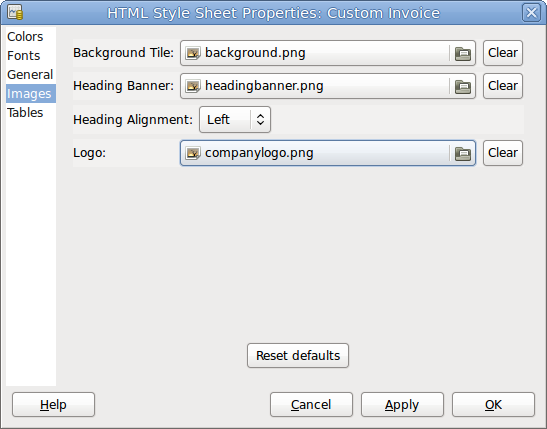
Give a Name to the new style sheet (e.g. Custom Invoice) and select the Fancy Template. When you click the button, the HTML Style Sheet Properties window is displayed. This window presents you five sections listed in the left pane: Colors, Fonts, General, Images, and Tables. The Colors section allows you to change the colors of various items of the invoice. The Fonts section lets you set fonts type and dimensions. The General section allows you to set the Preparer and Prepared for information, and to Enable Links. The Images section allows you to import graphics into the style sheet. The Tables section allows you to adjust the spacing around the tables which make up the invoice.
To include a company logo, banner heading and background image, use your favorite graphics
application such as The Gimp or Apache OpenOffice/LibreOffice Draw to save
the images in either GIF or PNG format. Then import
them into the style sheet using the Images section described above.
Below is an example that imports all three types of images.
| Note |
|---|---|
The images are placed in the invoice as follows. The Background Tile is tiled to become the background image, the Heading Banner goes to above the invoice text, and the Logo is placed in the upper left corner of the invoice to the left of the Heading Banner. You will probably have to try a few different sized images until you get the invoices to print nicely. Some sizing suggestions are that the Logo should be 1 square cm (~0.5 inch), and the Heading Banner should be 15 cm (~6 inches) wide and 1 cm (~0.5 inch) tall. | |
With the style sheet configured, when you print the invoice, you select the style sheet to use from the menu. Below is the resultant invoice after applying the style sheet demonstrated above.