GnuCash can be run from your desktop main menu by selecting the associated menu entry.
Alternatively it can be run from a command line prompt with the command gnucash.
During start up, GnuCash will display the Splash Screen, where some information about the program
(version number, build, etc.) and the loading process are displayed.
The very first time you open GnuCash, you will see the Welcome to GnuCash!
screen. This dialog includes three choices:
Create a new set of accounts - Runs the New Account Hierarchy Setup assistant (see Section 2.3.2, “New Account Hierarchy Setup”). Select this option if you want to be assisted in creating a set of accounts.
Import my QIF files - Runs the Import QIF Files assistant (see Section 3.1.3, “Import QIF”). Select this option if you already have Quicken files (
.qiffiles) and wish to import them intoGnuCash.Open the new user tutorial - Opens the
GnuCashTutorial and Concepts Guide. Select this option if you are completely new toGnuCashand accounting concepts.
 | Note |
|---|---|
It is possible to access each of these items after you have left this screen, but the Welcome to GnuCash! screen will not reappear. To create a new set of accounts, see Section 2.3.2, “New Account Hierarchy Setup”. To import QIF files, see Section 3.1.3, “Import QIF”. | |
The New Account Hierarchy Setup assistant helps you to create a set of GnuCash
accounts. It will appear if you choose
in the Welcome to GnuCash! menu, or when you select
→ (Ctrl+N)
. You may also use it to add a section of accounts to an existing book from the
Accounts page by selecting
→
.
This assistant will guide you through the creation of a Chart of Accounts. There are several steps in the assistant, which are outlined below.
The first screen briefly describes what this assistant does.
New Book Options appears only when creating a new book. Here you set various book attributes. This page has four tabs: Accounts, Budgeting, Business, and Counters. These items are explained elsewhere in the Guide, and can be changed at any time from → (Ctrl+Enter) .
Choose Currency sets the hidden root account currency and the default currency for new accounts. The offered default is based on the computer locale settings. Choose this carefully: Not only does it set the default currency for creating new accounts, it is the "Home" currency for the book and becomes the default currency for all stock pricing and foreign currency exchange rates. While it can be changed by rerunning the New Account Hierarchy Setup Assistant from the menu, doing so after you've created transactions is risky.
Choose accounts to create provides a variety of accounting categories that may be added to the book. There are two main panels: On the left the list of categories with a selection check box next to each one and on the right the accounts that will be added by the highlighted category.
Above the Categories list you'll find two list-buttons, one for language code and the other for country code. The initial selection is again based on your computer's locale settings. You may select any language and country combination that suits your needs.
Note The New Account Hierarchy Setup Assistant can't process selections from more than one locale at a time, so if you need to select segments from multiple locales—perhaps because the categories for your primary locale are intended to extend those of another country—you'll need to run the assistant more than once from the menu.
Setup selected accounts presents the accounts from the categories you selected on Choose accounts to create in a non-collapsible tree view with four or five columns depending on whether or not you're creating a new book:
Account Name. This is editable, just click in it or select the row and press Enter.
Type Not editable. This is the type of the account.
Placeholder accounts (accounts that are intended only to collect sub-accounts and not to have transactions themselves). You may change this by checking to make an account a placeholder or unchecking to make it a regular account.
Opening Balances can accept a value for new non-placeholder accounts that are not of type Equity, as existing accounts already have balances, placeholder accounts can't have transactions, and Equity can't have an opening balance.
Note Opening Balance entry isn't obvious until you click in it. You must move out of the entry by clicking somewhere or by pressing Tab or Enter before clicking or your entry will be discarded.
Use Existing appears only when you've started the New Account Hierarchy Setup Assistant from the menu. It indicates whether an account already exists. It's not editable.
Finish account setup is the last screen and gives you a final option to cancel the process, back up to change something, or apply to confirm your choices. If you're creating a new book,
GnuCashwill present a dialog to select a backend and either a file to save it or database server, database name, and credentials to create a MySQL or PostgreSQL database if GnuCash was built with those features and you have the necessary dependencies installed.
Warning If you choose to cancel, any selections you have made up to this point will be lost.
GnuCash provides a Tip of the Day screen to give helpful hints for using the
program:
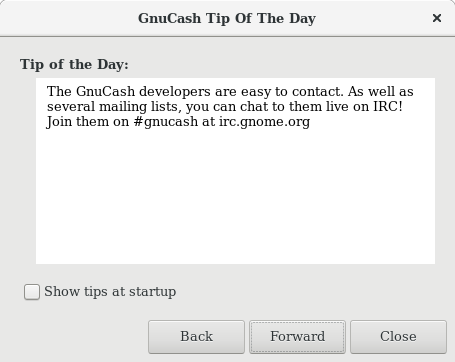
These tips provide useful information for beginning users. To view more of the tips, click to continue. If you do not wish to see this screen box on start-up, deselect the box next to Show tips at startup. When you have finished viewing the helpful tips, click to close the Tip of the Day screen.
You should now see the Accounts window, which appears as shown below. The exact layout of the account tree will depend on which default accounts you selected during the New Account Hierarchy Setup. In this example, the Common Accounts are shown.
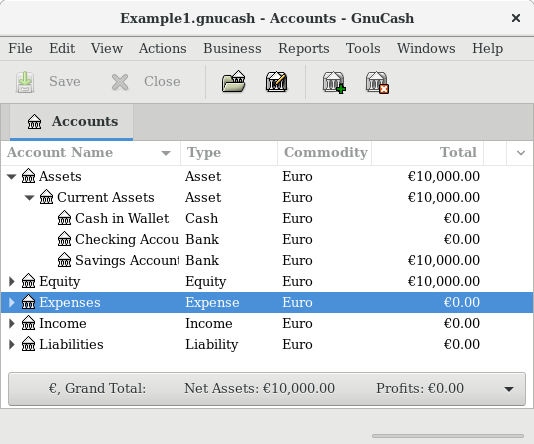
The Account Tree window (also known as a Chart of Accounts, or CoA) provides an overview of the data contained in the current file. It contains a list of account names and their current balances.
From this window, you can open the register of any account either by double-clicking the account
name, right clicking the account name and selecting Open Account from
the menu, or by using the button on the toolbar. GnuCash allows
you to have as many account registers open as you wish. For more information on using
account registers, see Section 2.3.5, “Account Register Window”.
 | Tip |
|---|---|
Clicking the small triangle to the left of an account that has children will expand the tree view showing child accounts. | |
At the top of this window is the Titlebar, which displays the file name for this set of accounts (once you have saved the file.) Below that is the Menubar. You can access the menu options by either clicking on these menu headings or by using shortcuts and access keys (see Section 2.3.9, “Menu Shortcuts”). Next is the Toolbar, which contains buttons for the most common functions.
The account tree appears below the Toolbar. Once you have started creating accounts, the account names will appear in the account tree. You can customize which headings show up by using the small down-arrow at the far right just above the account tree.
At the bottom is the Statusbar, which tells you information about what you own (Net Assets) and how much money you have made (Profits).
Account Register windows are used to enter and edit your account data. As the name suggests, they look similar to a checkbook register.
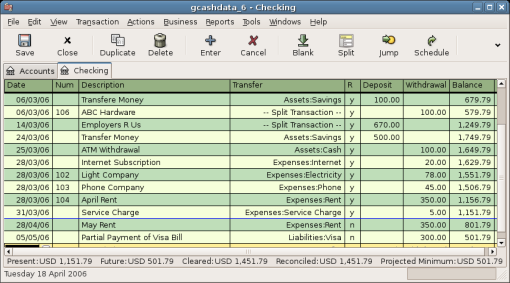
Section 2.9, “Transactions” explains more about account register windows and how to enter data into them. For now, note that the parts of an account register window are similar to the parts of the account tree window described earlier. The Titlebar at the top contains the account name. Below that, the Menubar contains menu options related to the account register. Toolbar buttons simplify common data entry functions. The Statusbar at the bottom of the window, displays some account balances covered in Section 2.9, “Transactions”. At the bottom of the account register window, information appears about the current location of the cursor.
| Note |
|---|---|
In the register windows, you can resize the various columns that The Description column is designed to expand automatically to fill all unused horizontal screen space. Therefore you should set the widths of all your other columns before setting the Description column width. The Balance column must be resized by double-clicking on the column heading. | |
Both the account tree window and the account register window contain Toolbar buttons. These buttons provide quick access to common functions such as and in the account tree window and and in the account register window. If you are not sure what a button does, move the mouse pointer over that button, and you should see a description of the function appear.
Here is a summary of the account tree window buttons:
Account tree window buttons
Save the current file to disk
Close the current notebook page
- , , and
These are functions related to accounts. They are discussed in Section 2.8, “Accounts”.
Register-specific buttons are discussed in Section 2.9, “Transactions”.
GnuCash uses a tabbed model that allows you to open multiple account registers and reports
simultaneously. Each open window (which can include account registers, reports, or Scheduled
Transactions windows) is given a tab on this bar that you can click to view that window.
Tabs can be configured in Preferences to appear along any side of the GnuCash window.
To see the full name for a tab, hover the mouse pointer over an account window tab. If more tabs are open than can be displayed across the window, some tabs will not display.
| Tip |
|---|---|
| |
The account tree window and the account register window both contain menu headings in a Menubar. Clicking on a menu heading brings up the menu items for that heading.
You can click on the account tree menu headings and then move the mouse pointer over the menu items to see what they do. As the pointer moves over a menu item, a description of the item appears in the lower left-hand corner of the window (inside the Statusbar). To select a menu item, click on it.
You can also access the most common menu items in a window by right-clicking the mouse anywhere in that window. In the account tree window, this will bring up a list of account items. In the account register window, this will bring up a list of transaction items.
Other ways of accessing menu items are through keyboard shortcuts and access keys, described next.
All of the menu items have access keys which are marked by underlined characters in the menu names. Pressing the Alt key with the underlined character in the menu heading will bring up the menu items for that heading. Once the menu items are displayed, type the underlined character in the menu item to activate it. For example, typing Alt+F in the main window brings up the menu, then typing S will save the file. Access keys are fixed and cannot be changed by users.
Some of the more commonly used menu items also have shortcut keys that directly activate the command without having to traverse the menu structure. These shortcuts typically use the Ctrl key, although they can use any key combination. Menu shortcuts are displayed at the end of each menu item.