Now that you have built an account hierarchy in the previous section, this section will show you how
to create and populate the accounts with your investment portfolio. After this initial setup
of your portfolio, you may have shares of stock purchased from before you started using GnuCash.
For these stocks, follow the instructions in the
Entering Preexisting Shares section. If you have
just purchased your stocks, then use the
Buying New Shares section.
This section will show you how to add stocks and mutual fund accounts to GnuCash. In this section, we
will assume you are using the basic account setup introduced in the previous section, but
the principles can be applied to any account hierarchy.
You should have within the top level Asset account, a few levels down, an account entitled Stock. Open the account tree to this level by clicking on the “right facing triangle marker” signs next to the account names until the tree is opened to the depth of the new account. You will need to create a sub-account (of type stock) under the Stock account for every stock you own. Every stock is a separate account. The naming of these stock accounts is usually done using the stock ticker abbreviation, though account names may be anything that is clear to you and other users. So, for example, you could name your accounts AMZN, IBM and NST for your Amazon, IBM and NSTAR stocks respectively. Below is a schematic model of the layout (only showing the Assets sub-accounts).
 Assets
    Investments
       Brokerage Accounts
          Bond
          Mutual Funds
          Market Index
          Stock
             AMZN
             IBM
NST | Note |
|---|---|
If you want to track income (dividends/interest/capital gains) on a per-stock or fund basis, you will need to create an Income:Dividends:STOCKSYMBOL, Income:Cap Gain (Long):STOCKSYMBOL, Income:Cap Gain (Short):STOCKSYMBOL and Income:Interest:STOCKSYMBOL account for each stock you own that pays dividends or interest. | |
As an example, let’s assume that you currently own 100 shares of Amazon stock. First, create the stock account AMZN by selecting the Stock account and click on the menu + . The New Account dialog will appear, follow the steps, in the sequence below to setup your new stock account.
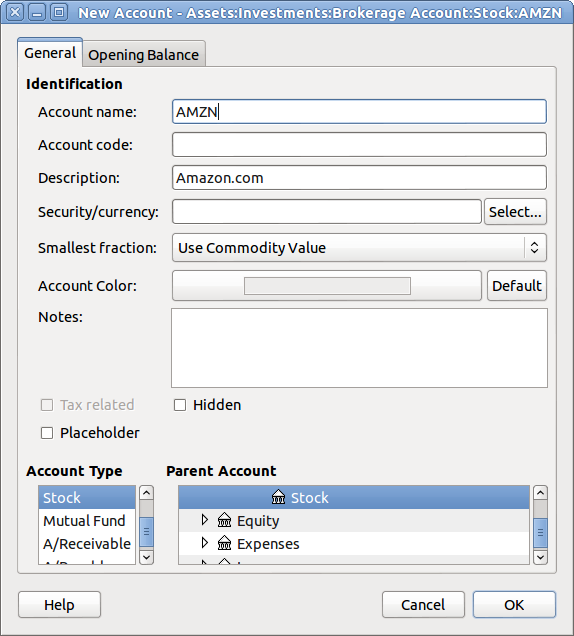
Account Name - Usually, use the stock ticker abbreviation, like “
AMZN”.Account Code - Optional field, use CUSIP, the newspaper listing symbol, mutual fund family ID or code of your own choosing.
Description - Optional field for detailed description of the commodity/stock. Note this field by default is displayed in the Account tab tree.
Account Type - Select the type of account you are creating from the lower left-hand list.
Parent Account - Select the parent account for the new account from the right hand listing. Expand list of accounts if necessary.
Create the New Security - To use a new stock, you must create the stock as a new commodity.
Note Be sure to first select Account Type Stock or Mutual Fund so that the button brings up the list of securities rather than currencies.
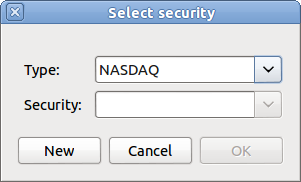
Select Security/Currency - Click on the button next to the Security/currency line. We must change the security from the default (your default currency) to this specific stock. This will bring up the Select Security dialog.
Type - Select the exchange where the security/commodity is traded (in this example NASDAQ).
Select the button to open the New Security window.
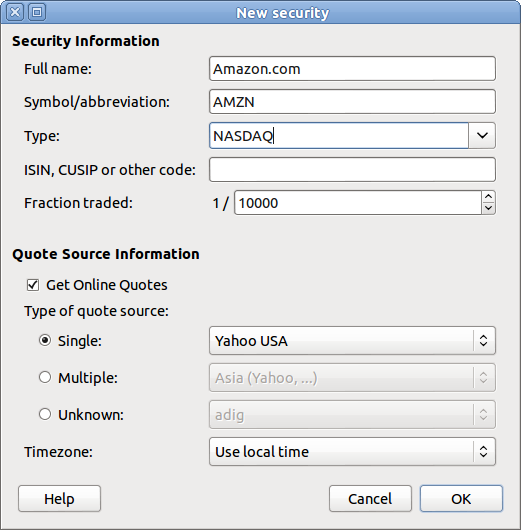
Create the Security - Click on the button and enter the appropriate information for this stock on the new form New Security.
The Full name: is
Amazon.com.The Symbol/abbreviation: is
AMZN. The symbol is the stock ticker used in your quote source several lines down on the form.Note Different symbols will be used on different price sources for the same stock, an example is Ericsson on the Stockholm Exchange is ERIC-B while on Yahoo it is ERRICB.ST.
The Type: should already be NASDAQ, because this is what was selected in the security selector, but you can change it here, including adding more categories. More information about this can be found in the
GnuCashManual in section 8.7, “Security Editor”.The ISIN, CUSIP or other code is where you can enter some other coding number or text (leave it blank in this example).
The Fraction traded should be adjusted to the smallest fraction of this security which can be traded, usually 1/100 or 1/10000.
The checkbox “Get Online Quotes”, the quote source and the timezone should be selected to define the sources for updating prices on-line. See also Section 9.6.3, “Configuring for Automatic Retrieval of Quotes”.
Note If the button is not highlighted, and it is not tickable, then the
Finance::Quotepackage is not installed. See the chapter Setting Up the Quote Retrieval in the manual.Below is what this window should look like when finished:
Save Security - Click on the button to save this new security, this will close the New Security window and return to the New Account window.
Select the Security - you should now see the newly created security available in the pull down menu for Security/Currency. Select it (it is probably already selected) and click on .
Smallest Fraction - Specify the smallest fraction of the security/commodity that is traded.
Notes - Enter any notes or messages related to this security/commodity.
Tax Related - Go to → to check this box if this account’s transactions will relate to Income Taxes.
Placeholder - Check box if this account is a “Placeholder”, that is it will contain no transactions.
Finished - You should now have been automatically returned to the New Account dialog, with the symbol/abbreviation: line set to “AMZN (Amazon.com)”. Click on to save this new stock account.
You have now created the Amazon stock account, your main account should look something like this (notice that there are a few extra accounts here, a bank account, and an equity account):
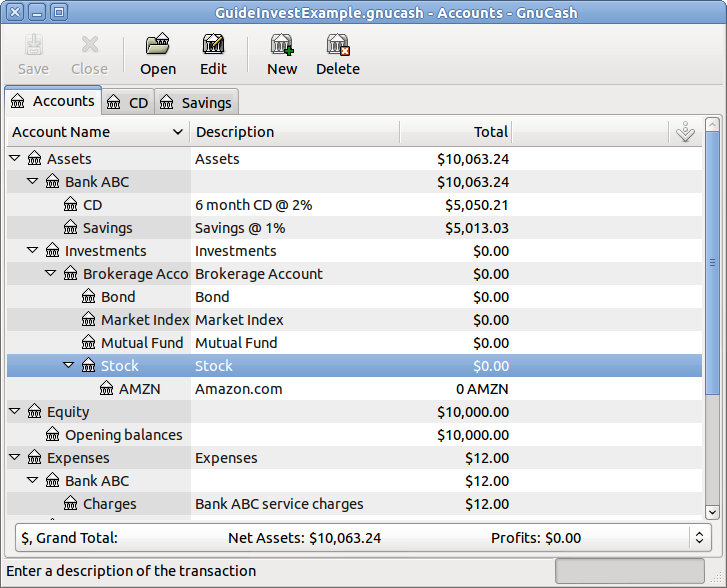
Open the account register window for this AMZN stock account (double click on it). Here you see the Commodity view. This gives you an overview of the transactions in this commodity including the number of units (shares for a stock or mutual fund) bought or sold, the net price per unit, and the total amount. Obviously, we have not bought or sold any shares of AMZN yet, so the register should not contain any transactions.